|
Article and Photography by Stephen Kristof
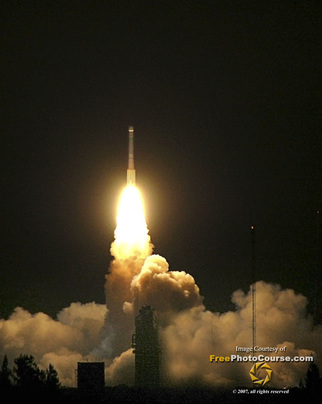
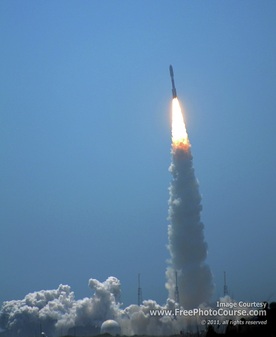
Staff Writer/Photographer © 2011, FreePhotoCourse.com; all rights reserved Now that the space shuttle era is officially (and regrettably) over, space launch fans and photographers have no choice but to redirect their attention and enthusiasm to the spacecraft that started it all and, will apparently, carry it forward – the noble rocket. I've photographed various shuttle and rocket launches over the years and recently took advantage of another launch opportunity in Cape Canaveral, Florida. To be completely honest, I was somewhat less excited about this particular launch than I had been about others that I've had the privilege to enjoy seeing in past years. Perhaps I was a bit jaded, but more likely, felt dispirited because I had not been able to see the very last shuttle launch on July 8, 2011, when Atlantis made its final fiery ascent. Nevertheless, I packed-up my photo gear and headed-off to what proved to be a fantastic viewing spot for the launch of a United Launch Alliance Atlas V rocket with a very special payload. This August 5, 2011 launch marked the beginning of NASA's Juno mission to Jupiter. This particular rocket can be launched in a variety of configurations, either with no solid fuel boosters at all or with up to five boosters attached. For the Juno launch, this rocket had all five boosters, meaning a far more spectacular display of fire, sound and pure raw power! 197 feet tall and 2.5 million pounds of thrust...WOW! The launch was far more exciting than I had expected and was so impressive that I can't wait to see the next one. |
While the space shuttle launches were the granddaddies of them all, keep in mind that the closest any non-NASA or non-official could get to one was about 7 miles from the launch pad, which required advance tickets and a Kennedy Space Center bus ride to a restricted area called the NASA Causeway. Despite that distance, the show was breathtaking and chest-thumping! However, over the years, most people who have watched and photographed a shuttle launch did so either from Titusville to the west of the launch pads or south, on the beaches, causeways and piers of Cape Canaveral and Cocoa Beach. These more common viewing locations are between 11.5 and 14 miles from the shuttle pads.
"...a far more spectacular display of fire, sound and pure raw power!"
When you consider just how far away you had to be in order to view a shuttle launch, it's exciting to learn that, depending on the rocket, free viewing and photographing opportunities can be had as close as 3 miles from the launch site. (Read below for some suggestions about great rocket launch viewing locations.)
While we can't bring the shuttle and its magnificent display back, we can still enjoy some truly awe-inspiring launch experiences, watching the various rockets that continue to bring satellites and, soon, astronauts into space. (The Atlas V rocket with five solid boosters featured in my launch pictures below is the same vehicle and configuration that Boeing recently selected to carry their new Crew Space Transportation spacecraft, the “CST 100”, paving the way for commercial human spaceflight in the near future.
Whether you are planning to travel to the Cape Canaveral area specifically to watch a rocket launch or have the good fortune to be visiting Central Florida when one is scheduled to lift-off, you're in for a real treat. Getting some great pictures of the event is quite the bonus and something that makes the few minutes that it takes for a rocket to race out of sight last a lifetime! Scroll down to find-out the secrets for taking great space launch pictures.
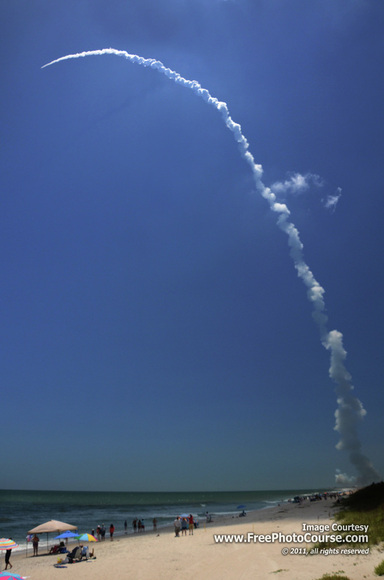
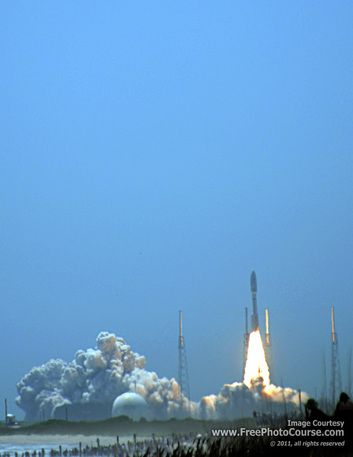
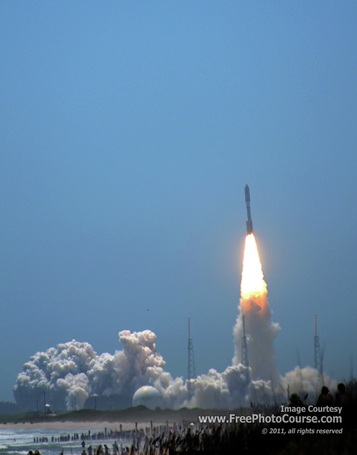
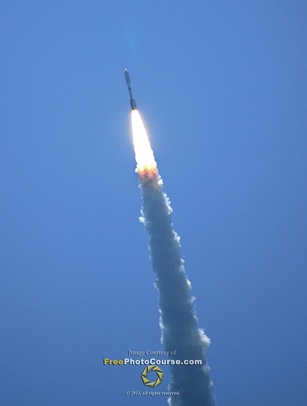
Atlas V Rocket with all 5 solid fuel boosters; lift-off from Launch Complex 41, Cape Canaveral, Florida. Rocket carrying
spacecraft for NASA's Juno mission to Jupiter, launched August 5, 2011.
Photographed from Playalinda Beach, Canaveral National Seashore. Photo Data: Nikon D7000, 80-300mm
full frame Nikon zoom lens (focal length set to 300, equivalent 450mm), ISO 200, f/8, 1/1600.
Photo Credit: Stephen Kristof for FreePhotoCourse.com, © 2011, all rights reserved.
|
|
SPACE LAUNCH PHOTO TIP #3 – LENS SUGGESTIONS:
I would recommend a zoom lens rather than a fixed telephoto for most amateur photographers, for the simple reason that you may want to widen your shot near the end of the launch in order to get a wide vista of the contrail and landscape. Having said this, if you are an experienced photog and you are choosing between an 18-105 mm zoom lens, an 80-300mm zoom lens and a 600mm fixed-length telephoto lens, I would suggest using the longest focal length fixed lens to get the closest possible shots of the initial steam, fire and ascent, switching to your zoom lens with the widest aspect as quickly as possible at the point of solid booster ejection, allowing you to get the panoramic contrail shots before the smoke and vapor dissipates.
SPACE LAUNCH PHOTO TIP #4 – TRIPOD USE:
As noted in Tip 1 above, a tripod is an absolute necessity when photographing a rocket launch. One additional suggestion is to orientate your tripod so that you are shooting vertically. (A basic composition rule would suggest that a moving object be photographed in the same orientation as its overall motion.) As well, it is helpful to make sure that you loosen the bolts enough sothat you can easily tilt upward and diagonally as you follow the ascent.
SPACE LAUNCH PHOTO TIP #5 – MANUAL EXPOSURE:
As much as a tripod is a must, manual exposure is also crucial. Do NOT shoot on auto mode!
|
For daylight launches, try the following: ISO 100-200, f/8, 1/1000-1/1600. Of course, use your light meter as a guide and take practice shots in advance of the launch. (As your focal length increases, your shutter speed will have to as well.) If you have a Nikon camera, try the D-Lighting feature, as it will provide for more latitude; remember that a launch has a lot of very bright and very dark elements and the D-Lighting will compensate for this.
For twilight or night launches, try the follwing: ISO 200-320, f5.6, 1/800-1/1600. (Remove all filters as you may get an internal reflection when photographing night rocket launches.) |
|
SPACE LAUNCH PHOTO TIP #6 – PRE-FOCUS:
If there is one mistake that is most common and most responsible for ruined launch photos, it's the use of auto-focus. Use it and your camera will surely NOT focus on the rocket.
You need to photograph in manual focus mode. This will allow you to pre-focus on the launch pad. Remember that you are located at a minimum of about 3 miles from the launch pad, depending on the space vehicle. Focusing on an object that far away has an advantage; as the rocket bolts toward the upper atmosphere, its changing distance will have little effect on the sharpness.
SPACE LAUNCH PHOTO TIP #7 – CONTINUOUS SHOOTING:
Set you camera to “burst” or continuous shooting, so that you can knock-off frame after frame during the initial stages of lift-off. However, there is a warning here! If your camera or memory card is not fast enough to process continuous shooting without lag time, ignore this recommendation because you could find yourself waiting for your camera to be “ready” to take more pictures during the ascent.
SPACE LAUNCH PHOTO TIP #8 – POLARIZING FILTER:
This tip applies exclusively to daylight launches. Being that space launches never happen in the rain or under heavy cloud cover, it's likely that the sky will be clear, perhaps perforated by a few puffy white clouds here and there. If this is the case, use your circular polarizing filter to enhance the sky's depth of blue and overall contrast. This is also helpful in the summer, when Florida's heat and humidity often pair-up to create a lot of haze; something that is quite disadvantageous in long-distance photography. The increased contrast offered by a polarizing filter can help counter the effects of the haze, as can a UV filter. Just remember that as you turn and set your polarizing filter to get the greatest contrast, you will need to re-set it if you change from horizontal-to-vertical orientation or vice-versa.
SPACE LAUNCH PHOTO TIP #9 – WIDE ANGLE FOR CONTRAILS:
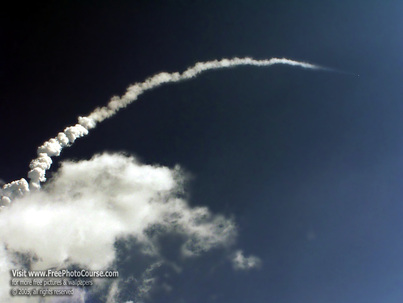
Don't forget to get some wide angle shots just before the fire from the rocket disappears. You will find that the vapor and smoke contrail will rapidly dissapate or drift and you need to be on the ball to capture it before this occurs. Try both vertical and horizontal orientations for these sweeping landscape and contrail shots.
I have also seen some late day and twilight launches, after which the contrail begins to play with the setting sun in such a way that the vivid orange and red colors provide for yet another show after the launch. This can look amazing in a picture!
The contrail basically won't come into play during night launches, but something else can be even more eye-catching. If you have a second camera and tripod, you might want to set it on a wide angle and use a very long exposure or “bulb” setting for the duration of the night launch. Doing this will result in a dramatic motion capture and perhaps some cool reflections on the river or ocean, depending on your viewing location.
SPACE LAUNCH PHOTO TIP #10 – ROCKET LAUNCH VIEWING LOCATIONS in Florida:
Kennedy Space Center: The visitor center itself may not be as close to various launch pads as some of the other locations listed below, but it makes for a very thrilling day when the Space Center experience is combined with an actual launch seen from KSC property! From time-to-time, there may also be an opportunity to purchase a launch viewing ticket (not included in regular admission and must be purchased in advance) that provides for a relatively close viewing option. This was more in-play for the former shuttle launches, but there are indications that NASA may continue the practice for high-profile launches. (As an example, about 2,000 special ticket holders were able to view the recent Juno launch referenced in this article, from the Apollo/Saturn V Center on KSC property; this is the old media viewing location used during the Apollo launch days.)
Port Canaveral – Jetty Park: Jetty Park sits along the ocean at the entrance to Port Canaveral and boasts a 1,200 foot long fishing pier that provides for spectacular views of Delta 2 (pad LC-17) and Delta 4 (pad LC-37) rockets. This location is only 2.9 miles from the Delta 2 launch pad, which is close enough to get a full rocket view using a modest zoom lens. Delta 4 rocket launches can be seen from 8.5 miles at this location. Atlas V and Space-X's Falcon 9 rockets both launch from pad LC-41, which is about 12 miles from this same location.
Cocoa Beach Pier: While known to be a popular spot for local surfers, the pier's various restaurants, bars, shops and fishing opportunities play second-fiddle to a bigger show on launch days. The pier is long, at 842 feet, offering some nice opportunities for wide-angled launch shots, particularly with an atractive beach and ocean in the foreground. However, if you're looking to take close-up launch images, keep in mind that the Cocoa Beach Pier is about 3 miles south of Jetty Park, so even the relatively close Delta 2 launches are about 6 rather than 3 miles from pad 17, meaning in practical terms, that you will need a much stronger focal length to get a glimpse of the rocket.
Beaches at Cape Canaveral and Cocoa Beach: These are among the most popular options for viewing a rocket launch. The beaches in this area are extremely wide and accommodate many onlookers. The view and distances to rockets are very similar to what you would see at Jetty Park or the Cocoa Beach Pier, considering the distances down the beach.
SR 528 Banana River Causeway: Thankfully for both anglers and launch watchers, parking along the side of the road on the 528 Causeway is still allowed. Although it gets really busy and packed-in with vehicles on launch days, this particular location along a man-made road/shoreline in the Banana River provides for beautiful launch photos on clear days. Delta 4 rockets launch at about 10 miles from this location; look slightly to the right and down the length of the river – it's a good view, but you may not be able to see the steam and fire at the very beginning of the ascent. Delta 2 rockets lift-off at about 6 miles from the causeway, but in this case, you'll be looking far toward the right with various port buildings and possibly ships in the foreground. When you're on the causeway, Atlas V and Falcon 9 rockets launch from about 13 miles away. Look in generally the same direction as you would a Delta 4 launch. The water can provide for some very attractive wide-angle views.
Space Launch Park, Titusville: For long, a favorite among launch enthusiasts, Space Launch Park (and the various other parks along the Banana River in Titusville) offered some of the most spectacular views of the now mothballed space shuttles. You can still take-in a beautiful launch vista here, but at 14 miles from the Atlas V / Falcon 9 launch pad, 16 miles from the Atlas V launch pad and 19 miles from the Delta 2 launch complex, there are closer options. Having said this, the area parks really do offer superior shots for afternoon and late day launches because the sun is to your back, lighting-up the contrail, increasing contrast and cutting haze...all naturally!
Playalinda Beach, Canaveral National Seashore: Playalinda Beach is part of the Merritt Island National Wildlife Reserve, located on the Canaveral National Seashore. There is a nominal entry fee per person. It is the cheapest fee for the most amazing show around – especially when it comes to an Atlas V launch. If you plan to view a launch from here, be forewarned that for some launches (ie. manned or military) the entire reserve and beach area may be closed to all traffic. This was standard procedure for all space shuttle flights, but it would be advisable to check in advance before going there on a launch day. Atlas V or Falcon 9 launches are amazing from this location – especially in the case of an Atlas V with all 5 solid fuel boosters. Not only can you see the rocket with your bare eyes at only about 4.5 miles distance, but you will certainly feel and hear the rumble as you snap your amazing pictures! This spot is about 8.5 miles from the Delta 4 launch pad, but about 14 miles from a Delta 2 launch.
If you go to this location, be prepared as you would for a beach day. Clear days in the warm season can be extremely hot and there is really no shade or respite from the sun unless you bring along a hat and an umbrella. There is no water, food or really, anything else, for sale here, so you're really on your own. It is, after all, a wildlife reserve. If you want to get really close to the Delta 4 launches at this location, you can walk south on the beach until you hit a barrier fence. Crossing the fence is absolutely prohibited. Period. Taking pictures at this farthest point will get you about 3.75 miles from the pad.
All in all, there are a wide variety of options and locations to decide upon. Not everyone wants to get really close to a launch for a variety of reasons, including the traffic and people congestion, desire for a wider angled panorama and access to amenities. However, regardless where you are when a rocket lifts-off, you are in for quite a show and, in this case, you camera may even thank you!
Professional photographers know and use these secrets, and now you can too!
In no time, you'll be creating STUNNING ROCKET LAUNCH images just like the pictures on the above!
In no time, you'll be creating STUNNING ROCKET LAUNCH images just like the pictures on the above!
Pictures keep coming out blurry? Read our next fantastic How-To Photography Article:
How to Take Clear Pictures
LINKS:
HOME PHOTO TIPS INDEX DIGITAL PHOTOGRAPHY COURSE "HOW TO" INDEX PHOTO FORUM
SITE SEARCH CONTRIBUTOR'S GALLERY CAMERA & GEAR STORE FREE DIGITAL IMAGES
PHOTOGRAPHER PROFILES NYC EXPOSED
© FreePhotoCourse.com. All rights reserved. Reproduction, storage, copying, publishing, manipulation, digitizing or selling of any of the text or photos on this website is strictly prohibited. Under no circumstances shall any part of the content on this website be plagiarized or referenced as the work of an author or photographer. Re-selling of any of the content on this site is strictly prohibited. The lessons on this website were provided free of charge for individual home users; if you paid for any of this you have been cheated. Please report any misuse, sale or plagiarism of this material here OR E-MAIL US AT: CONTACT@FREEPHOTOCOURSE.COM
Browse, learn, purchase and explore with confidence.
Certified virus-free, malware-free, spyware-free, scam-free and spam-free
Associate-Sponsor Disclosure Content Download & Terms of Use Privacy Policy Contact Us Contributor's Gallery Terms of Use Forum Terms of Use
Certified virus-free, malware-free, spyware-free, scam-free and spam-free
Associate-Sponsor Disclosure Content Download & Terms of Use Privacy Policy Contact Us Contributor's Gallery Terms of Use Forum Terms of Use

