
|
LESSON 2 - Camera Tutorial, Part 5
(F-Stops, Aperture, Exposure...What's it All About?!!) Article by Stephen J. Kristof © 2010, all rights reserved If you've been following these lessons with a serious approach toward your learning, then your understanding of the art and technology of photography has likely grown by leaps and bounds compared to where you were initially. You now have an appreciation for the history of photography and where it all started. You also understand the fundamentals of light, lenses, focal length, zooming, focusing, macro mode, the shutter, and fast and slow shutter effects. Most recently near the bottom of the last lesson, you learned how shutter speed also affects the total amount of light entering the camera and therefore the overall exposure. To maximize your learning experience and to help you become a better photographer to eventually impress and even earn cash, please stick to the order of things! Take your time and bookmark this site so that you can visit frequently over time as you build your understanding and try the techniques on your own. Visit frequently as we add to our content periodically! |
|
The Aperture
As you learned previously, shutter speed is not justabout freezing or showing the motion of moving subjects. It also affects the amount of light that is getting into the camera. There is another, more direct, way of controlling the amount of light that hits the CMOS or CCD imaging chip. As you see in the title of this section, it has to do with the camera's aperture and something called f-stops.
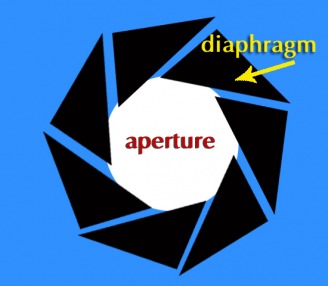
Depending on the type of camera you are using, there is something called a diaphragm either in the camera itself or, more commonly, tucked inside the lens. The diaphragm (also called an "iris") consists of a set of flat metal leaves that slide over one another to create a larger or smaller hole through which light can enter the camera. It makes sense, then, that the most direct way of increasing exposure would be to make that hole bigger and the most effective way of decreasing exposure would be to make that hole smaller. This hole is called an aperture.
Take a look at the illustration below for a representation of the leaves of the diaphragm (black) and the resulting aperture (in white).
 |
|
It's worth noting that as the hole gets bigger, more light enters the camera and the result is increased exposure and vice-versa. If your camera is equipped with fully manual exposure control or has an "aperture priority" mode, you can adjust the aperture at will.
The F-Stop
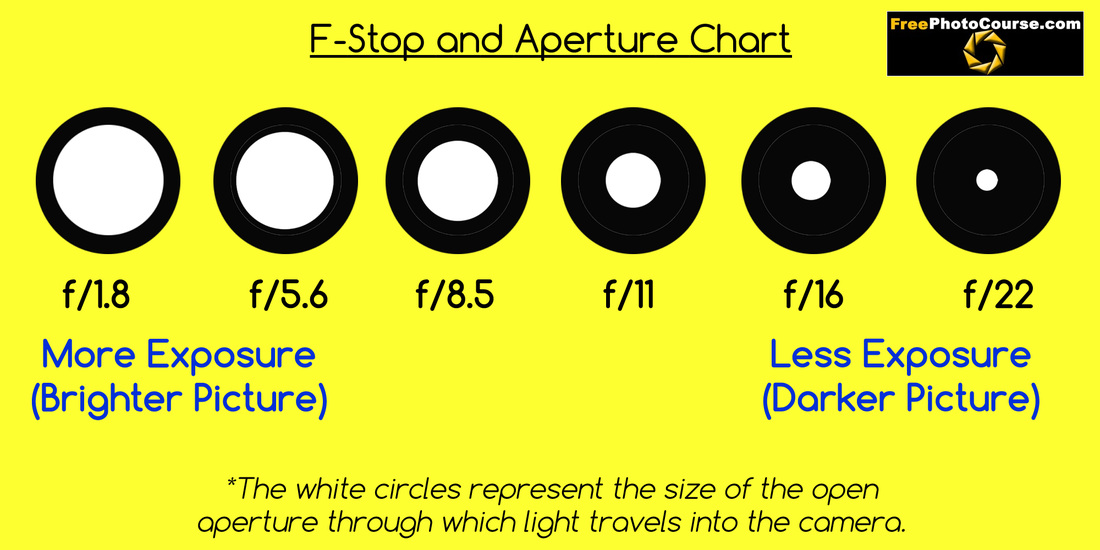
F-Stops are standardized guide numbers that are assigned to the different aperture sizes. Different lenses have different aperture values, although a generally accepted average set of aperture f-stop values on an average removable SLR or DSLR lens is listed below.
Also understand that there is an inverse relationship, in that higher numbered f-stops relate to LESS light entering the camera, while lower numbered f-stops relate to MORE light entering the camera, as shown below. (The blue circles represent the size of aperture opening.)
 f-8 works on this particular day, with whatever shutter speed and ISO were required to work together to provide this balanced exposure.  f-1.8 allows too much light in (shutter speed and ISO remained the same)  f-22 is too small an aperture to allow enough light in (shutter speed and ISO remained the same) |
O.K., BUT HOW DOES THE F-STOP AFFECT THE PICTURE? With all other things being equal (amount of light, shutter speed and chip sensitivity (ISO), the exposure will change as the f-stop is set to higher or lower numbers. In the example to the left, an aperture of f-8 provided ideal exposure, given the day's particular brightness, the chosen shutter speed and the camera's ISO light sensitivity setting. However, the next photo to the left shows how changing ONLY the f-stop to a lower number (1.8) allows too much light pass through a wider aperture, resulting in overexposure (too bright). Again, looking at the next example to the left, see how changing the f-stop to a higher number (22), allows far less light to pass through a tiny aperture, resulting in severe underexposure (too dark). *Consider that f-8 worked in this particular image because of the other factors. However, this is not a cure-all aperture and in EVERY instance, the amount of light, shutter speed and light sensitivity of the camera's CCD or CMOS chip will ALSO influence exposure. As such, there is no magic f-stop that is suitable for all types of shooting. |
The INVERSE RELATIONSHIP applies to
BOTH f-stops and shutter speeds...
Aperture (f-stop) and shutter speeds are the two most common and important ways of controlling exposure. What's more, the inverse relationship applies to both of these controls. Here's how it works:
|
HIGHER F-STOP NUMBER
HIGHER SHUTTER SPEED NUMBER LOWER F-STOP NUMBER LOWER SHUTTER SPEED NUMBER |
=
= = = |
LESS LIGHT ENTERS CAMERA
LESS LIGHT ENTERS CAMERA MORE LIGHT ENTER CAMERA MORE LIGHT ENTERS CAMERA |
So, why is this so difficult for most people to remember? Unfortunately, our everyday activities and interaction with numbers program our brain to expect that higher numbers will result in more of something, while lower numbers result in less of something. But when it comes to photographic exposure, we need to get our heads around the idea that higher numbers will result in LESS light exposure and lower numbers will result in MORE light exposure.
Now that you know all about how the camera works, including the lens, focusing, the CCD or CMOS, shutter speeds, f-stops, apertures and inverse relationships, it's now time to learn how to put all of these things together in such a way that a properly exposed image can be created.
At this point, you may be thinking, "This is very confusing. I don't understand how to choose shutter speeds in conjunction with f-stops and end-up with a properly exposed image! Something must be missing here..."
You are entirely correct. What's missing is something called "ISO" which refers to the variable light-sensitivity of your CCD or CMOS chip and yet another concept - the light meter - which will be your invaluable guide to getting a proper exposure.
© FreePhotoCourse.com. All rights reserved. Reproduction, storage, copying, publishing, manipulation, digitizing or selling of any of the text or photos on this website is strictly prohibited. Under no circumstances shall any part of the content on this website be plagiarized or referenced as the work of an author or photographer. Re-selling of any of the content on this site is strictly prohibited. The lessons on this website were provided free of charge for individual home users; if you paid for any of this you have been cheated. Please report any misuse, sale or plagiarism of this material here OR E-MAIL US AT: CONTACT@FREEPHOTOCOURSE.COM