Professional Photography
|
Photo Composition Tutorial #7
How to Take Better Portraits, Part Two
(Click here for Part One of this article)
Article by Stephen Kristof
FreePhotoCourse.com Staff Writer
As promised, here are the rest of my eight easy-to-use photo composition tips that will help anyone create magical photo portraits of friends, family, models or clients:
5. Arranging Couples: Together Not Centered; Together Not Apart
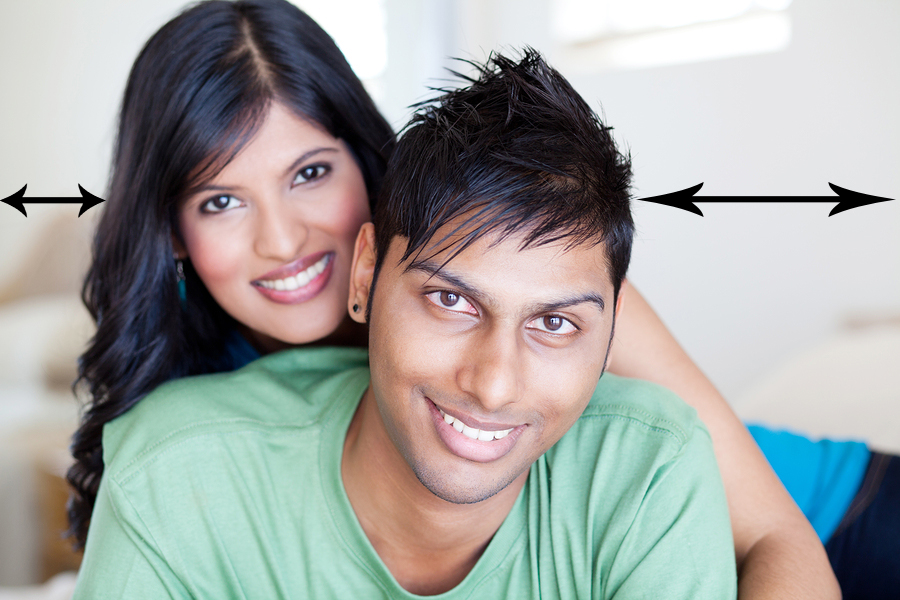
When taking a portrait of two people, please, please, please avoid placing both subjects in the middle of the frame and, just as importantly, avoid placing each person on alternate sides of the frame. If this sounds familiar, it's because it's an extension of my advice given in Part One of this tutorial. Remember the spiel about the Rule of Thirds? It's not just for single subjects. The Rule of Thirds should also be followed when there are two or more subjects in front of your camera lens.
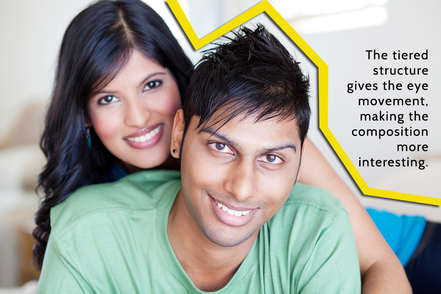
In the picture above, the attractive young couple are posed using a very comfortable, yet, meaningful arrangement. The significant empty negative space created on the left side of the frame, provides an incentive for the eye to spend time enjoying the couple's expressions without feeling overwhelmed by clutter in the background. The fact that they are not centered in the frame is a definite plus and allows for a more artistic style of composition. See below what happens with the slightly shifted off-balance arrangement and the gentle tiering structure that engages the eye.
6. Frame Your Subject Within a Frame
|
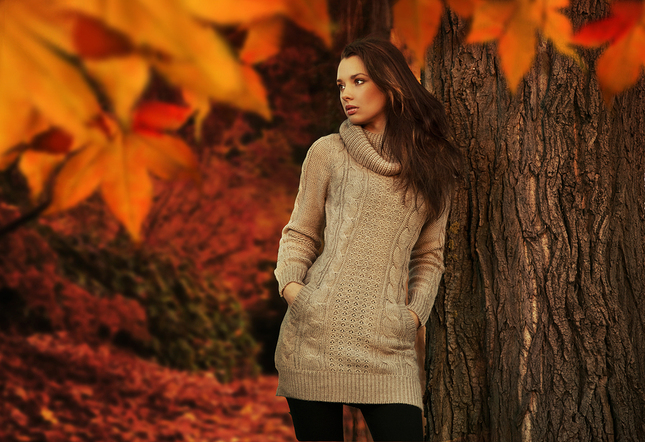
Whether indoor or outdoor, a photographer can look for features in the environment that will act as a natural frame, thus framing your subject a second time; first within the picture frame and second within the natural frame.
The picture to the right is about as classic as they come when thinking about outdoor natural frame options. The tree trunk on the right, flanked by the purposely blurry leaves at the top, serves to rest all attention on the attractive young model. Borrowing from a previous technique in Part One of this article - Short Depth of Field in Portraiture - the blurred background aesthetically supports the natural frame. You may also find human-made objects, door frames and even empty picture frames that work well with this technique! |
7. Looking Back at the Camera and Other Body-Head Combinations
|
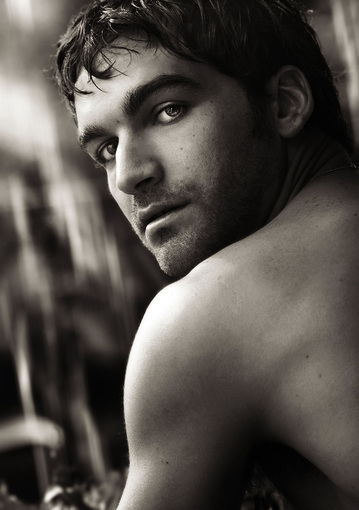
Mix it up a little! Instead of composing every portrait from directly in front of your subject with him or her facing the general direction of the lens, try experimenting with some different body-head combinations. The male subject to the left, with his undaunted expression, appears to gaze at the viewer as though he wants to take a second look. It's a rather easy technique to employ and anyone with a camera can try it!
Have your subject sit, stand or lean in a way that is most comfortable for them. Ask your subject not to change the direction in which his or her body faces. Next, move around your subject and if his or her head naturally moves with you, this effect is created. If the subject does not turn their head on their own, you may have to give a prompt. I would recommend doing these types of shots with a fast shutter speed and using the burst (multiple frames) feature of your camera. That way, you'll capture multiple photos as you move and as your subject moves, and you won't get any blur. You'll be surprised how different the images will look and how the expression changes. I've used this technique both with and without the subject looking directly at the lens. Both can be effective, yet totally different. You can also adjust this approach, with your subject's body facing the camera, yet their head turned slightly away. Do this with the eyes glancing back at the lens and once again looking away. The key here is to avoid posing or over-posing your subject. The photographer can do more work here as he or she moves around the subject. |
8. Strive to Create Interesting Perspectives
|
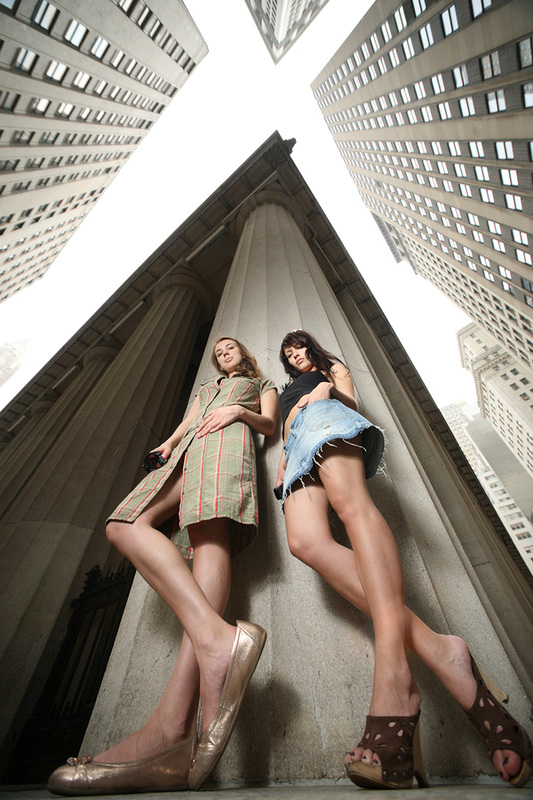
My final advice on portrait composition is to try and create some unusual, yet eye-catching, portraits by using different perspectives and angles. Who says you have to hold your camera at eye-level? I would suggest getting a bit more adventurous by moving up and down; in other words, rather than risking having your subject looking overly posed and possibly annoyed, you can do the work and let them relax. The best part of trying out unusual perspectives is that a photographer is frequently surprised with the unexpected results; portraits that can be emotionally compelling, visually arresting and addictive. With certain perspectives, particularly those which employ severe low or high angles, the environment can become stitched to the subject, creating something that's far more interesting than the sum of the environment plus the subject. The example on the right does just that. The architecture around the girls, the pillars, and the compositional lines and shapes are all very interesting and, photographically speaking, meaningful. The imposing look of the confident young women and their downward glance is also very interesting. However, the combination of all of these elements results in a spectacular photo that's far more interesting and powerful than the sum of its parts. Note how distorted the girls' feet and legs appear? This is created through a combination of the obtuse angle and a very wide angle lens (ie. 10-16mm). With the camera literally sitting on the ground, the rest of the magic has to do with the lens and the angle. Think about using ladders or stairs to get above your subject - or - getting closer to the ground and looking up. You can also get your camera closer to one part of your subject's body than another or super-close to one side of their face. Experiment and you'll end-up with some sure winners! |
Hopefully you gained a lot of easy-to-use and valuable portrait composition ideas from this and Part 1 of this article/tutorial. As always, consider sending-in a few examples of your own successful portrait photos and our Submissions Review Team may post your best work in our monthly Contributor's Gallery. If you 'd like send us an email with up to three photos attached, send it to:
"submissions@FreePhotoCourse (dot) com"
Happy shooting fellow shutterbugs!
Check back for more Photo Composition Tips and Tutorials,
because we'll be adding more on a regular basis!
LINKS:
HOME PHOTO TIPS INDEX FULL COURSE INDEX "HOW TO" INDEX PHOTO FORUM GREAT CITIES EXPOSED
SITE SEARCH CONTRIBUTOR'S GALLERY COMPOSITION TUTORIALS PHOTO LINKS FREE DIGITAL IMAGES
© FreePhotoCourse.com. All rights reserved. Reproduction, storage, copying, publishing, manipulation, digitizing or selling of any of the text or photos on this website is strictly prohibited. Under no circumstances shall any part of the content on this website be plagiarized or referenced as the work of an author or photographer. Re-selling of any of the content on this site is strictly prohibited. The lessons on this website were provided free of charge for individual home users; if you paid for any of this you have been cheated. Please report any misuse, sale or plagiarism of this material here OR E-MAIL US AT: CONTACT@FREEPHOTOCOURSE.COM
Browse, learn, purchase and explore with confidence.
Certified virus-free, malware-free, spyware-free, scam-free and spam-free.
Certified virus-free, malware-free, spyware-free, scam-free and spam-free.


