
LESSON 3 - DSLR Camera Techniques, Part 4
(Exposure Control - When to Ignore the Light Meter)
Article by Stephen J. Kristof
© 2010, all rights reserved
"I'm beginning to get a good sense of how to understand the light meter, but I've been told that there are circumstances in which it should ignored. Is this true?"
Below we'll explore the situations in which you should use your own judgment.
Ignore the Light Meter?
Most cameras have an "auto" exposure setting and, in fact, this is the default on all standard point-and-shoot cameras. Whether or not you realize it, when you are photograing in auto mode, your camera is using light metering technology to determine the proper exposure variables (f-stop, shutter speed and ISO), according to a default algorythm or pre-set programs such as "sports", "portrait", "twlight", etc. Therefore, whether you are photographing in the manual setting as we recommend (using the light meter if equipped and self-adjusting your exposure settings) - or - shooting in auto mode, a light metering function is being engaged either way.
But there are times when it is actually preferable to use the light meter as a "pre-determinant", influencing your own decision making which may or may not reflect the light meter's recommendation of exposure variables. Below are some suggestions regarding when to ignore or only partially use the light meter.
(a) Correcting a Backlighting Problem
What is a "backlighting problem", you may ask? Simply put, you have a backlighting problem when there is more light behind your subject than there is illuminating the subject. In other words, this occurs when the background is brighter than the subject itself.
This is most commonly encountered when photographing in indoor settings with artificial lighting or windows behind subjects. Although artificial room lighting (such as table or floor lamps) is intended to illuminate the room in such a way that the "incident light" bathes the entire environment equally, this is simply not the case. Instead, various indoor artificial light sources tend to be far more directional than people realize. As a result, light is bounced around the room, reflecting off certain surfaces while leaving other surfaces, corners or areas in the dark. This is problematic when shooting indoors without additional light from, for instance, a diffused flash unit. But it can be even more of a problem when the light sources if directly behind your subject.
Daylight hours "natural light" from windows can provide more of the desired "incident light" to more evenly distribute light around a room. However, when that window is directly behind your subject, it, too, will cause backlighting problems. This is because, again, the light behind your subject is brighter than that reflected off the subject.
The most common ways of correcting a backlighting problem are as follows:
●Remove the back light (ie. close a curtain or shut-off the lamp)
●Switch positions, so that the brighter light sources is behind the camera instead of behind the
subject
●Illuminate the subject with diffuse light (ie. use a reflector, diffused flash or lighting)
●Open the aperture manually beyond what the light meter suggests
The fourth solution listed above deals specifically with ignoring the initial light meter reading. The best approach is to take a pre-reading, using your camera as if it were a portable light meter. Take a light meter reading off the front or side of your subject (if you are photographing a human subject, position the camera lens about 8 inches from the side or front of the subject's face). Base your exposure variables on this reading, because this reading measures the actual light reflected off your subject rather than the brighter background light. We assume that you have chosen an ISO setting and shutter speed in advance of this step.
Once you have chosen a suitable f-stop according to this pre-reading from the side or front of the subject, reposition yourself to the intended camera distance and angle and...
...ignore the light meter!
At this point, the light meter will show that too much light is entering the lens for a proper exposure. However, your pre-reading is accurate. This secondary reading takes the backlight into consideration which, of course, provides an inaccurate measure. Ignore the secondary reading, capture your images and you're done! (You will notice that in this instance, the background light will be far brighter than it should for a proper exposure. However, the subject will be properly exposed, which is more important than the background light.)
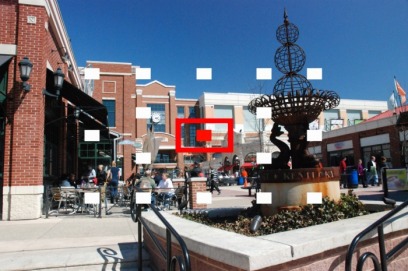 In this example, the red indicator in the middle would denote that the camera's metering system is set to a single 'center-weighted' option. When the shutter button is pressed half-way, only that which appears behind the red indicator will be used to determine exposure or light-meter response. 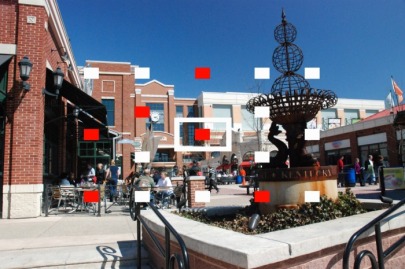 The mult-point metering option shown here allows the light meter to respond to an 'average' of several points of varied light intensity throughout the frame. This average may or may not be reflective of the lighting profile of the focal point or main subject. |
A note on multi-point metering: DSLR cameras commonly allow the user to adjust exposure hot spots within a frame, thereby choosing between either a single or center-weighted point for metering - or - multiple points for averaged metering. The latter multi-point metering sounds like a good alternative, particularly when encountering lighting of varied intensity at different points within your frame, such as would be experienced in a back lighting situation. However, you will likely be more accurate and successful using either a hand-held meter or using your camera as a portable light meter as explained above, as this will provide the proper exposure for the main focal point or subject itself. |
|
(b) Capturing Snow, Bright Waterside Scenes, Sunsets and Long Exposure Images Your camera's internal light meter, while quite sophisticated, is restricted to measuring the light that is reflected off surfaces as opposed to the incident light that drapes or bathes a scene. This latter light ambience is the best measure of overall light intensity (or luminosity) when trying to photograph certain challenging scenes. This particularly relates to images of snow, beach, water side and sunset shots. We would suggest using a combination your own brain along with the camera's suggested light meter reading, as opposed to a decision based exclusively on the light meter. By way of example, if you are shooting a scene with a great deal of brightly-lit white, such as you would encounter with snow, bright sandy beaches, and/or sparkling water features, try taking some photos with exposure variables based on the meter reading, then shoot several more images with incrementally brighter and dimmer exposures. Wait until you get back to your computer to see which setting provided the best exposure for the subject matter. This is called "bracketing" and all photographers use it to varying extents. You may also notice that when shooting long exposures, such as longer than 1/2 second, the light meter on most DSLR cameras will cease to operate. So if you wish to photograph amazing night-time skyline, lightning, cityscape or experimental images using very long exposures, you will need to bracket and experiment. And always remember - what may look properly exposed on the camera's LCD screen may in actuality be way too bright or too dark when viewed on a proper monitor. Bracket, bracket and then bracket again! |
|
(c) Using a Grey Card to Overcome Metering Issues
Despite the quick-fixes noted in "a" and "b" above, there is a third and more standard approach to solve the problems posed by varied intensities of reflected light within one frame. Specifically, using a pre-manufactured photo tool called a "grey card", can be an equally effective means of compensation and metering. Countless photo gear manufacturers sell grey cards that are usually comprised of a large grey center area flanked by much smaller bright white and dark black outer areas. The large grey center is 18% grey (18% reflectance), which is the perfect shade and reflectance to measure the incident light bathing a certain shooting location.
Thus, using a grey card allows the photographer to use an in-camera reflective light meter much like a portable incident light meter. In order to use one, you need to hold the card (or have an assistant hold the card) at a 180 degree angle (perfectly parallel) to the lens, in the direction one would be photographing. Take your light meter off this card and you will likely see a marked improvement in your photographic endeavors!
© FreePhotoCourse.com. All rights reserved. Reproduction, storage, copying, publishing, manipulation, digitizing or selling of any of the text or photos on this website is strictly prohibited. Under no circumstances shall any part of the content on this website be plagiarized or referenced as the work of an author or photographer. Re-selling of any of the content on this site is strictly prohibited. The lessons on this website were provided free of charge for individual home users; if you paid for any of this you have been cheated. Please report any misuse, sale or plagiarism of this material here OR E-MAIL US AT: CONTACT@FREEPHOTOCOURSE.COM
ADDITIONAL LEGALS - Click HERE to read our Disclosure and Associate-Sponsor Terms and Conditions; Click HERE to read our Content Download and Use Agreement
Browse, learn, purchase and explore with confidence.
Certified virus-free, malware-free, spyware-free, scam-free and spam-free.
Certified virus-free, malware-free, spyware-free, scam-free and spam-free.