
Our Free Online Digital Photography Course is always here when you need to learn something new or to refine your understanding of a particular photography technique or concept! Best of all, you need not become a member or pay any course fees. By the way, while you're here, why not check-out our Photography Blog, where you can gain insights from our writers and photographers about everyday photography issues, observations and challenges.
LESSON 4 - Depth of Field Tutorial
(How to Change Depth of Field)
Article by Stephen J. Kristof
© 2010, all rights reserved
Being able to change how much of your photograph is in focus is a very useful tool. It has more to do with a certain exposure setting than it does with "expert focusing". Read on to find out how the secrets pro's use to alter depth of field...
First, the background...
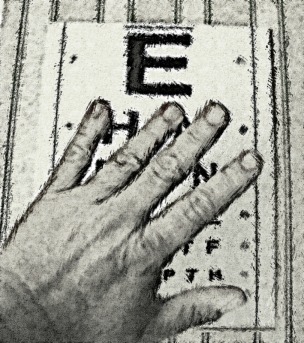
Various historical accounts suggest that former US president Ronald Reagan cheated on his military eye exam in the 1930’s so he could join the Cavalry Reserves. Apparently Reagan was myopic, challenged by the most common reason people wear eyeglasses; they can see things clearly when they are nearby, but have difficulty seeing things farther away. So, what does this have to do with the photographic techniques associated with “Depth of Field” and how, exactly, would one actually “cheat” on an eye exam?
Well, it actually has a great deal to do with the concept of depth of field and that’s specifically because of how a person decades ago would have successfully cheated while reading the eye chart.
Here’s how it works: Picture the 1930’s eye examination scenario; the doctor asks the patient to cover his left eye with his left hand, using his right eye to read the chart. Once read, the patient then covers his right eye, reading the chart with his left eye. Sounds straight-forward, right?
What Reagan and countless others before him likely did was to ignore what he was seeing with the uncovered eye and, instead, concentrate on what he saw through a tiny hole between the fingers of the hand covering his other eye. With a little bit of practice, one can easily manipulate the size of the gap between the middle and neighboring finger. The smaller and rounder the gap, the more it acts like a lens.
It’s the same principle behind a pinhole camera; such a camera can create fully recognizable images using a “lens” that’s nothing more than a perfectly round, tiny pinhole. A hole or “aperture” as it’s called in photography lingo, can act as a lens. The smaller the hole, the more its ability to concentrate and focus light. As it concentrates and focuses light, it also projects the image or scene that’s reflecting that light.
Q: So, any guess about how small holes or “apertures” relate to depth of field?
A: (click here for the answer!)
So, how does it work?
Take a look at the panels below for an overview of
how your camera's F-Stop affects the depth of field:
HOW TO GET SHORT DEPTH OF FIELD:
1. Position your subject away from any background walls; You must show depth in the background to see any
depth of field effect.
2. Aperture Priority - Choose the lowest f-stop available on your lens. You want to shoot with a wide aperture.
3. Get close to your subject. The closer you are to your subject, the shorter the depth of field. (ie. macro
shots almost always have extremely short depth of field)
4. Use a little zoom. Zooming to about 80-130mm on a DSLR camera will provide an increased short DoF
effect.
5. Focus on your subject and snap the shutter!
HOW TO GET LONG DEPTH OF FIELD:
1. Just as with short DoF, position your subject away from any background walls; You must show depth in the
background to see any depth of field effect.
2. Aperture Priority - Choose the highest f-stop that your lighting will allow. F-stops at 16 and 22 will give you
the best results. Remember, narrow apertures result in longer-distance focus.
3. The farther your subject is from the lens, the longer the depth of field will be. If you must get a close-up,
move your subject to a point at least 1 yard (1 meter) from the lens.
4. Do NOT use ZOOM or a telephoto lens! Widen your zoom as far as it will go. If you have a non-zoom wide
angle lens, this will deepen the long DoF.
5. Focus on your subject and press the shutter!
LINKS:
HOME PHOTO TIPS INDEX FULL COURSE INDEX COMPOSITION TUTORIALS "HOW TO" INDEX
SITE SEARCH CONTRIBUTOR'S GALLERY FEATURED PHOTOGRAPHERS FREE DIGITAL IMAGES FORUM
© FreePhotoCourse.com. All rights reserved. Reproduction, storage, copying, publishing, manipulation, digitizing or selling of any of the text or photos on this website is strictly prohibited. Under no circumstances shall any part of the content on this website be plagiarized or referenced as the work of an author or photographer. Re-selling of any of the content on this site is strictly prohibited. The lessons on this website were provided free of charge for individual home users; if you paid for any of this you have been cheated. Please report any misuse, sale or plagiarism of this material here OR E-MAIL US AT: CONTACT@FREEPHOTOCOURSE.COM
Browse, learn, purchase and explore with confidence.
Certified virus-free, malware-free, spyware-free, scam-free and spam-free.
Associate-Sponsor Disclosure Content Download & Terms of Use Privacy Policy Contact Us Contributor's Gallery Terms of Use Forum Terms of Use
Certified virus-free, malware-free, spyware-free, scam-free and spam-free.
Associate-Sponsor Disclosure Content Download & Terms of Use Privacy Policy Contact Us Contributor's Gallery Terms of Use Forum Terms of Use