Photography Tip #1:
How to Take Great Portraits (...Get Closer, Get Closer Again, then Get Even Closer.)
How to Take Great Portraits (...Get Closer, Get Closer Again, then Get Even Closer.)
There's nothing more disappointing in photography than failing to capture a special emotional or expressive moment, particularly when you managed to click the shutter at the right time. Imagine taking a photo of your wife, husband, child or any other human subject, just to later realize that you were so far away that the most important feature - your subject's face - is too far to reveal true expression or a hint of personality. It is often said that when novice photogs ask the pros for advice, what they hear in response is, "I have three pieces of advice for you. Number one, get closer. Number two, get even closer. Number three, get closer again."
Why is it so important to get closer? Part of the answer is obvious; when you get closer to your subject, he or she will take up a greater proportion of the frame, thus leaving little else to vie for the attention of the viewer. Consider the examples below:
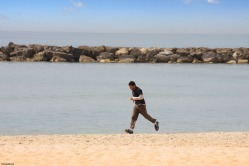
The joggers in the images directly above are lost in the vastness of the beach, water and sky around them. The photos of children at the top had the potential to be worthy of hanging on a wall, but these kids are so far away from the lens that the opportunity is lost. What percentage of the frame is occupied by the faces in these photos? We calculated it and, believe it or not, the entire body occupies less than 1/64 of the entire area of each of these images. That's a measly 1.5% of the entire frame! The most important feature, the face, takes up less than 0.3% of the total frame.
|
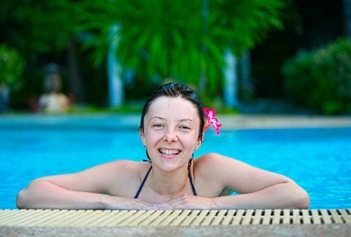
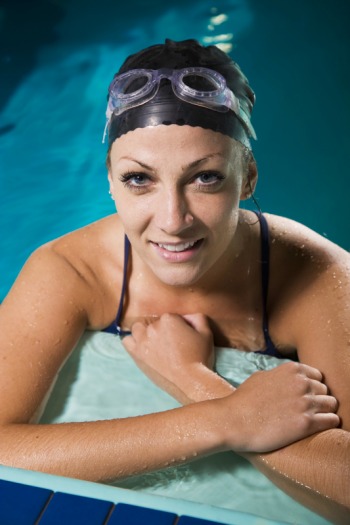
Look at these two poolside examples. Same general context, similar pose, different model. But why do they look so different? Perhaps we can explain it by suggesting that you are looking at two different subjects; right?
No, it's more than the subject. How about perspective? The perspective is different; the model on the right is viewed with a significant high angle, while the image above to the left is pretty much eye level. The vertical framing on the right makes a bit more sense with the position of the arms, while the one on the top left is also suitable as a horizontal frame considering the wider spread of the folded arms. |
Yes, these things all contribute to the different appearance of the two images. However, the MOST IMPORTANT difference is proximity! As we have discussed in this section, when you think you've gotten close enough, capture many images, then get closer, capture more images and then get even closer and capture even more images!
How much of the frame does the head occupy in the images above? First of all, let's agree that the image above on the left is a HUGE improvement compared to the four images above it. While the face in those four photos takes up less than 1% of the total frame area, the female swimmer shown above left occupies 1/12 (or about 8%) of the frame. Compare this to the the next image (above right) and see that this swimmer's head takes-up 1/7 (or about 14%) of the entire frame.
This isn't merely about how easy it is for a viewer to see and interpret a subject's facial features and expressions, although that's certainly a lot easier to do when there's more face to look at. The more important impact of getting closer, from a photo artist's standpoint, is that it allows one to compose a portrait in which the expression, mood or personality attribute is enhanced; in short, a more powerful portrait.
Pro Secret You Need to Know...
Look at how much more professional this style of photography is compared to the latter examples. They look like something you might see in a magazine. Don't be afraid of "getting too close"!
Tip 1a - Proximity and Context
Now that you understand how professional photographers use proximity to produce more dramatic and compelling portrait images, it's time to consider your background. Ask yourself how important the background is with respect to establishing the context. If the context is revealed by objects or elements in the background, then you need to ask yourself how important it is for the viewer to be aware of the context.
If the background contains distracting elements or other content that competes for attention, thus swaying interest away from your model/subject, then you need to omit these distracting or competing elements. Do so by getting closer as shown above, creating short depth of field (a topic discussed in length in our "How To" pages), using specific emphasis lighting (making the subject brighter and the background darker), moving yourself and/or your subject a bit or finding an entirely different location.
Context can be important because it can reveal things like location, time of day/night and other "clues" that help a photograph to make sense. But far too many people give context undue emphasis when framing images. Professional photographers understand this point. They don't grapple with indecision when photographing a subject in an interesting, attractive or extraordinary surrounding. Sure, they'll capture a bunch of frames with a wider view of the environment, but they usually put more emphasis first on the subject's face and, secondly, their body. The surrounding gets third billing.
Let's be honest here. If you're on vacation and you want to capture an image of your spouse, children or friends in standing front of the Eiffel Tower, Niagara Falls, the Sydney Opera House, the Alamo, the Colosseum, the Grand Canyon, the CN Tower, the White House or some lesser known but interesting landmark, then...you obviously have to reveal the context! Do so and make sure that you get the whole thing in the frame along with your subject. Make sure you don't "center" your subject. Get really low if the thing towers above your subject. But whatever you do, make sure you don't stop there!
The next thing on your list should be to try closer shots of your subject, experimenting with progressively closer images, thus relying on only a part of the landmark, albeit an important or revealing part. You'll probably prefer the latter images and, better yet, your subject will probably like them better too. One final piece of advice regarding contextual images. Instead of having your subject "pose" by looking toward the lens with the extraordinary scene behind them, why not try capturing a more candid and less contrived image. Show your subject from a partial profile, eyes drawn toward the scene rather than toward the lens. This will help to establish the awe and power of the surrounding.
Pro Secret You Need to Know...
The pro's have the benefit of experience that reminds them of their most extraordinary portrait images. They think about photo sessions they've done in the midst of extraordinary visual surroundings. And then they remember that the most extraordinary portraits taken during those sessions didn't show a whole lot of the background!
ASSIGNMENT:
How close are your portraits? If you're looking for an assignment, here's your first one, courtesy www.FreePhotoCourse.com. Review 12 of your most favorite portraits that you've produced in the past few years. Cut-out a circle of paper that represents the general size or area occupied by the subject's face. You'll likely need different sized cut-outs for each of your different photos. Find-out how many of these cut-outs will fit into the entire frame of a particular photo. The total space occupied by your subject's head will be equal to 1/x, where "x" = total cutouts that fit into the frame.
Record your results, then do this simple calculation. Divide one by "x" and multiply that product by 100. This will give you a figure that is the percentage of the total frame area occupied by your subject's face.
For example, If you fit about 14 cut-outs in the frame of a particular portrait, the subject's head in that portrait takes-up 1/14th of the entire frame.
To convert this to a percentage, you would in this example, calculate: 1 ÷ (divided by) 14 = 0.072. Multiply this product by 100 to get the percentage. 0.072 x 100 = 7.2%
If the average percentage amongst your favorite portraits is less than 10%, you probably have some work to do in the area of proximity.
Imagine, then, what your photographs can potentially reveal about your subject's emotional state, an aspect of his or her personality or the sense of human connection by merely getting the lens closer to the face.
Ask a Toddler...

If you have kids of your own or have spent any time babysitting toddlers at one time or another, you've likely experienced their visual "artwork". There's an interesting thing about toddlers and their simple, yet, visually accurate representation of the important aspects of a human face and it is often more insightful than the average wannabe photographer's concept.
Give a toddler a crayon and a piece of paper and ask him or her to draw a picture of "love". If the child has been brought-up in a nurturing environment with the kind of unconditional love upon which children thrive, he or she will generally produce a similar product, regardless of culture or other factors. What does it look like? Think about it. They will start by drawing two eyes. Then they'll complete their masterpiece with a smile. This well-adjusted, contented child is drawing a picture of his or her mom or dad.
That's it! Two eyes and a smile. But don't underestimate the importance of this; it is insanely important to portrait photography. The child draws the eyes first because the eyes are the most important visual element of the child's representation of the most crucial human emotion; love. The old "eyes are windows to the soul" adage has a great deal of significance to photography. How prominent are your portrait subject's eyes in your own images? Do you allow them to tell the story they hold? How about the mouth? Do you get close enough to 'hear' what the lips are about to say?
One more note about proximity.
A little "zoom" is O.K. when it comes to portraits. Any more than that spells disaster! Have you ever heard that the camera's lens adds ten pounds? If you get WAYYYY too close (ie. your lens is less than a foot from your subject's face) or try out that super 15X zoom camera on your subject from a far distance, the lens will create distortion that starts to skew and widen your subject's appearance. (There's actually little concern that you will get too close from a proximity standpoint. That's because of a social norm called "personal space" that kicks-in and warns us, "It's not polite to get the lens too close to people.") However, many amateur photographers take that social norm to the extreme and they end-up shooting subjects from absurd distances, letting that 'magnificent' zoom lens do all of the work. The problem is that the zoom or telephoto lens will widen and distort the image, and it's very likely that your subject will be less enamored with their appearance than they would with the social faux-pas of you getting reasonably close to get a nice shot.
RULE OF THUMB FOR PEOPLE PHOTOS...
One yard (meter) from your subject should work well.
FreePhotoCourse.com is your home for top-shelf photography lessons, digital camera tips, step-by-step how-to's, free digital backgrounds and the hottest photo equipment.
|
Photography Tip #2: “Hey Buddy, You Got a Light?” What factor or element is most important to photography? LIGHT is the answer and for good reason. Without light, there would be no such thing as photography. Light defines the sharpness, depth of colour, contrast, texture, tones and shapes that we see when we look at a photograph. It's interesting how many photography enthusiasts ignore this central and all-important element. WHERE is the SOURCE of your LIGHT? Avoid shooting toward the brightest light. Unless you are shooting a sunset or sunrise, do not shoot into the sun! When you are outdoors, shoot with the sun at your back and not at your subject's back. Well, not completely to your back. Bright sunlight shining directly at your subject’s face or on an inanimate object tends to flatten natural contours and make both people and objects look uninteresting. Direct sunlight can also cause people to squint. Change your position so that the sun behind you but at about a 20 degree angle. This way, your subject won’t squint. Better yet, the bit of an angle will show more of the distinct contour of faces and objects by revealing a bit of shadow and relief. If you’re in an indoor setting try to remember that your best shots will take advantage of the brightest light in the room or of a sunlit window, using them to illuminate your subject rather than placing your subject in front of the light source. “Backlighting” is a problem that’s caused when you shoot in a dim or dark environment and your subject is in front of light that is brighter than the ambient light that illuminates your subject. The result is that the camera will automatically reduce exposure to compensate for the brighter light and, in doing so, causes the subject to appear far too dark. The pre-programmed backlighting compensation feature on some cameras may help, but tends to less effective than other solutions. *(See Lesson #3 on Lighting and Backlighting for more on this) Force the Flash to Correct Backlighting or to Fill Shadows! If you can't avoid shooting into a bright light source, whether inside or out, make sure you are using your flash. If you have a DSLR camera (one with interchangeable lenses), you might also consider investing in the type of external top-mounted flash that almost all pro photographers have. Either way, most cameras have a "forced flash" setting that compels the camera's flash to burst even though the camera's automatic light metering system wants to suppress that flash. When you have an unavoidable backlighting problem, such as someone sitting in front of a window or lamp, or when you try to shoot a portrait in front of a sunset, you need to "force the flash" to fill-in the shadowed appearance. The "lightning bolt" icon on your camera indicates that the flash will burst regardless of whether the camera's metering system thinks it should or should not. |
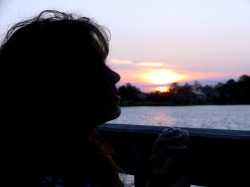 This is a common result of backlighting. The camera's auto function reduces exposure to compensate for the bright background light. In this case the sunset is far brighter than the dim light reflected off the subject's face. Although the sunset itself is properly exposed, the subject appears too dark to recognize. This is where a 'forced' or 'fill' flash would be useful. |
© FreePhotoCourse.com. All rights reserved. Reproduction, storage, copying, publishing, manipulation, digitizing or selling of any of the text or photos on this website is strictly prohibited. Under no circumstances shall any part of the content on this website be plagiarized or referenced as the work of an author or photographer. Re-selling of any of the content on this site is strictly prohibited. The lessons on this website were provided free of charge for individual home users; if you paid for any of this you have been cheated.
Please report any misuse, sale or plagiarism of this material here OR E-MAIL US AT: CONTACT@FREEPHOTOCOURSE.COM
Associate-Sponsor Disclosure Content Download & Terms of Use Privacy Policy Contact Us Contributor's Gallery Terms of Use Forum Terms of Use


