Professional Photography
|
|
Photo Composition Tutorial #6
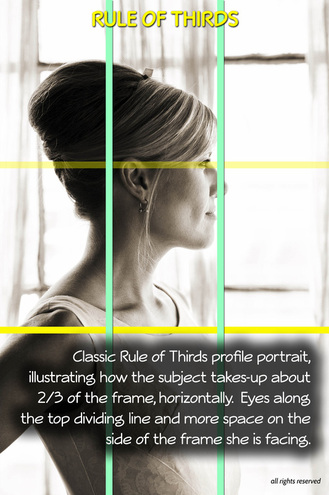
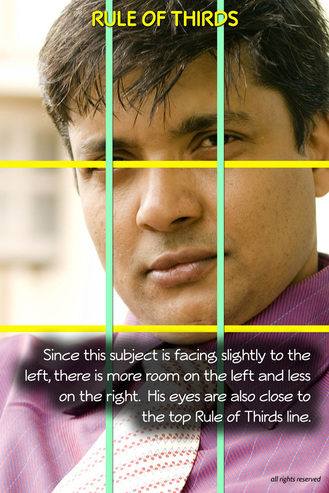
How to Take Better Portraits, Part One (click here for Part Two of this tutorial) Article by Stephen Kristof FreePhotoCourse.com Staff Writer If you made it through our previous composition lessons, you've learned a lot about the Rule-of-Thirds and how important it is when it comes to framing and arranging your subject matter. But how should you apply this convention to the human subject? What other tips will lead to better people pictures? "Portraiture" is the formal name for it, but most people know it more simply as, "Taking pictures of people." Regardless of what you call it, the portrait is one of the most challenging aspects of photography. That's why post-secondary photography art schools spend a considerable amount of instructional time, if not a majority of it, on portraiture. I've compiled a list of 8 specific and easy-to-use techniques that you can use right away to improve your portrait photos and here they are: 1. Use the Rule-of-Thirds in Portraits The eyes are the most crucial part of a portrait. They are the focal point. As such, always strive to place your subject's eyes along the top horizontal Rule-of-Thirds line. This will help you avoid vertical symmetry. In order to avoid horizontal symmetry, always leave a bit more room on one side of the photo (the side toward which your subject is facing). If your subject is facing you directly, you can move a bit to the left or right and, as your subject follows you by moving his or her head, they will then appear to be facing slightly to one side or the other. Leave a bit more space on the side of the frame toward which they are facing. See the illustration below on the right. If it is a medium close-up, you can usually put one of your subject's eyes near either the top left or right Rule-of-Thirds intersection as illustrated below on the left. |
|
|
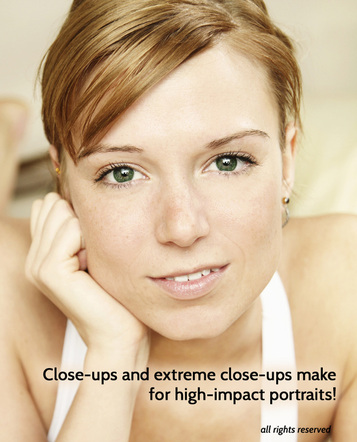
2. Extreme Close-ups for High-Impact Portraiture Fill the frame with your subject's face by using a mild zoom or by getting closer to your subject with a standard 50mm focal length. This helps highlight the most important part of your subject - the eyes. By filling the frame with the face (or even just a part of the face), the eyes take-up more space and become impossible to ignore...or resist! As you can see in the image on the right, you can even cut-off the top of your subject's head if that suits the mood and framing. The head shot is a classic portrait look that is usually associated with photos of professional models, celebrities and significant people in society. But don't think that your subject has to be rich, famous or flawlessly gorgeous to be framed with a head shot! When a photographer uses proper lighting and caters to the subject's comfort level, it's impact can be powerful and undeniable. Try to experiment by having your subject look directly at the lens, as well as looking slightly off-camera. The head shot can potentially work with both poses. |
3. Use Shallow Depth of Field in Portraiture
Have you ever noticed that most modern portraits taken by professional photographers feature blurred backgrounds? I'm not talking about the old-school, overly-formal in-studio shots that employ pull-down paper backdrops like fake bookcases and such. Instead, I'm referring to contemporary artistic people pictures, spanning everything from family and wedding portraits, through to commercial and glamor portraiture.
|
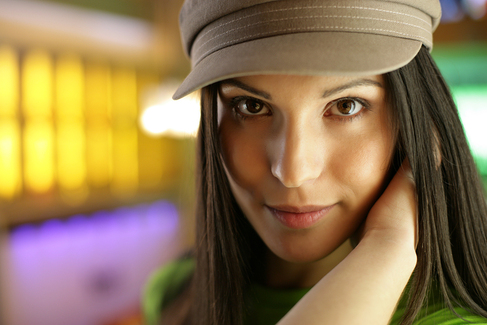
The effect is called short or shallow depth of field and it allows the viewer to concentrate all attention on the human subject because of its clarity, compared to the background which gets increasingly blurry the farther it is from the lens. The contrast of clarity with background blur creates a sense of depth, in which the subject appears to literally "pop out" of the picture frame, as shown in the portrait on the left.
The blurred background, also called "bokeh" (a Japanese photography term referring to the subjective beauty expressed in the out-of-focus areas of a photograph) also supports the portrait subject by providing a pleasing mash-up of colors, shades and vague shapes. In a sense, it's a bit like the hand-painted muslin backdrops commonly found in photographers' studios and theater stages, but in this case the photographer uses specific |
camera techniques and actual backgrounds, instead, to create a more realistic and aesthetically pleasing appearance.
So, how exactly does a photographer get this effect? If you are using a point-and-shoot camera, try using the "portrait" program mode (if equipped) AND zoom-into your subject's face from a bit of a distance. You must do both in order to get some bokeh. Admittedly, point-and-shoot or smart phone cameras will not create the kind of background blur shown above. Even if the camera or smart phone has a shallow depth of field "filter" or effect feature, it will not produce this kind of result. If you have a DSLR camera or a bridge camera that features a wide lens, your chances of getting this effect will improve dramatically.
So, how exactly does a photographer get this effect? If you are using a point-and-shoot camera, try using the "portrait" program mode (if equipped) AND zoom-into your subject's face from a bit of a distance. You must do both in order to get some bokeh. Admittedly, point-and-shoot or smart phone cameras will not create the kind of background blur shown above. Even if the camera or smart phone has a shallow depth of field "filter" or effect feature, it will not produce this kind of result. If you have a DSLR camera or a bridge camera that features a wide lens, your chances of getting this effect will improve dramatically.
|
Using your DSLR or bridge camera, shoot in manual exposure mode, choosing the lowest f-stop number available. Combine this proper focal length and you will get maximum bokeh effect. In terms of focal length, get very close to your subject (ie. 1/3 to 1/2 meter - same as 1/3 to 1/2 yard) and use a 50mm lens. Alternatively, you can move about 2-3 meters/yards away from your subject and use a a gentle zoom of 85mm-130mm. (In fact, using the zoom along with the low f-stop number will do a great job of maximizing this shallow DOF effect.) Either approach combined with the low f-stop number will help you produce this awesome effect!
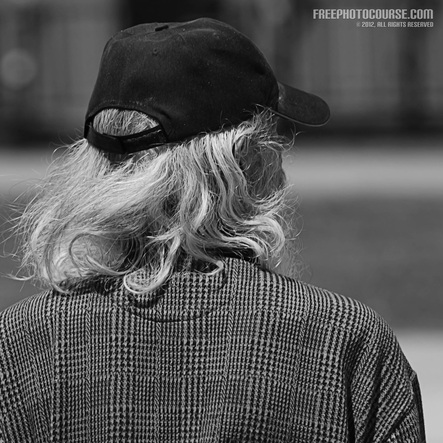
The effectiveness of this short DOF technique isn't exclusive to glamorous and attractive portraits. The example of street photography to the right shows how effective this can be, even in an off-beat genre of portraiture. Shot from behind with very shallow DOF, the exceptional detail of the subject stands-out against the nondescript blurred background. The individual strands of his wavy silver hair, the dust on his ballcap and the detail in his hounds-tooth jacket stand in sharp contrast to the fact that, from this angle, the man is faceless. (As an example of social commentary, this portrait speaks of society's general refusal to look at or acknowledge those who have slipped through the cracks.) |
4. Capture Your Subject Doing or Interacting with Something
Today's dynamic and creative young photographers are making portraits that pop by trying new things. Then again, perhaps it's more a case of the 'what's old is new again' syndrome, but nevertheless, it works and it works well. Famous Armenian-Canadian Portrait Photographer Yousuf Karsh was, unequivocally, one of the greatest masters of twentieth century photography. He was commissioned to photograph more famous and powerful people around the globe than any other single photographer before or since, and many of these renowned people are now visually recognized in history by the portraits Karsh composed.
He photographed the likes of Queen Elizabeth II, President John F. Kennedy, Martin Luther King, Ernest Hemmingway, Sir Winston Churchill, Mother Teresa, Nelson Mandela and Albert Einstein. These photo subjects represent just the very beginning of a long list of head-turners with whom Karsh had worked. But beyond these more traditional portraits, Karsh was also known to incorporate the ideas of 'doing' and 'props' with his well-known subjects. While doing a photo shoot with fellow artist Pablo Picasso, Karsh had him interact with a sculpture. When photographing Popes Pius XI, John XXIII, Paul VI and John Paul II (yes, he photographed all four of these 21st century popes!), he had them pose in prayer. When Karsh photographed Walt Disney, he situated the movie icon with a film camera and with giant posters of his famous cartoon characters. And when photographing Dr. Jonas Salk, who discovered the vaccine that prevented the dreadfully disabling disease of polio, Yousuf Karsh captured the magical and famous portrait of Salk inoculating a little girl.
|
The point is that as early as the 1950's, this prominent photographer had stumbled upon an important reality. He discovered that while photographing people - not just famous and powerful people, but anyone at all - having them doing things they enjoy or posing with props with which they can identify, can result in extremely moving and important portraiture. Also, because the subject's comfort level is enhanced by being with something related to a hobby, profession or situation in life, the resulting portrait can be tremendously honest; in other words, portraiture that is pure and meaningful.
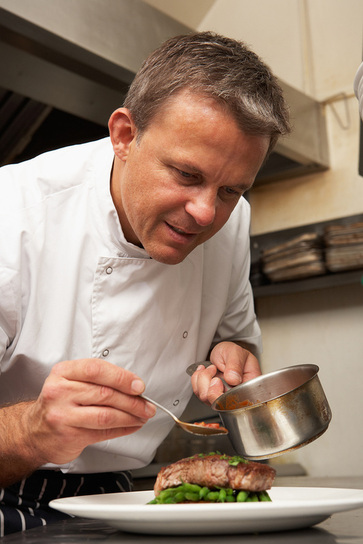
As illustrated in the image on the right, our chef is captured while applying his craft. He obviously has a passion for cooking and the photographer is able to connect the 'doing' aspect of the moment to the chef's powerful expression. The subject appears focused on the details, obviously consumed by what he is doing and enjoying what he does. This kind of portrait relies on props and doing, but it goes beyond that. The most important thing is that by doing something that's interesting, relaxing or that immerses the subject in the moment, the photographer is able to capture something that is very honest and expressive. Honesty and expressiveness? Of course! After all, isn't that what a good portrait should show? The great thing is that it's so easy to do. When setting-up a portrait session, whether it's for family, friends or paid clients, ask your subject in advance where they would be most comfortable and what they would like to be doing. Ask about hobbies, special interests and special places, and don't rule out work. Think about indoor and outdoor locations, and any physical objects that need to be brought along. You'll find that you don't need to pose your subject because while doing something, posing takes care of itself and it looks far more authentic. Simply allow your subject to do what they enjoy doing and you merely have to snap away from different angles and perspectives. For this contemporary style of portrait, you can say goodbye to the dated studio with paper backdrop look and your subject will likely be far more satisfied with the result! |
Check-out the second part of this tutorial, with even more great portrait tips that will make a big difference in your people pictures.
Check back for more Photo Composition Tips and Tutorials,
because we'll be adding more on a regular basis!
LINKS:
HOME PHOTO TIPS INDEX FULL COURSE INDEX "HOW TO" INDEX PHOTO FORUM GREAT CITIES EXPOSED
SITE SEARCH CONTRIBUTOR'S GALLERY COMPOSITION TUTORIALS PHOTO LINKS FREE DIGITAL IMAGES
© FreePhotoCourse.com. All rights reserved. Reproduction, storage, copying, publishing, manipulation, digitizing or selling of any of the text or photos on this website is strictly prohibited. Under no circumstances shall any part of the content on this website be plagiarized or referenced as the work of an author or photographer. Re-selling of any of the content on this site is strictly prohibited. The lessons on this website were provided free of charge for individual home users; if you paid for any of this you have been cheated. Please report any misuse, sale or plagiarism of this material here OR E-MAIL US AT: CONTACT@FREEPHOTOCOURSE.COM
Browse, learn, purchase and explore with confidence.
Certified virus-free, malware-free, spyware-free, scam-free and spam-free.
Certified virus-free, malware-free, spyware-free, scam-free and spam-free.


